|
Go through the prompts for the doctor centre.
Explain to students that we have different roles in the doctor centre depending on whether you are a patient or a doctor. If you are a patient, you need to tell the doctor how you are feeling. Students TPS some things they would feel (symptoms) when going to the doctors. If they are a doctor they need to find out what is wrong with the patient by asking questions, writing down how they are feeling, check patient using special equipment and tell the patient what they need to do to feel better. Show the students the video of ‘I want to be a doctor’. This video shows the role of a doctor and the specific tools a doctor uses and what each instrument is used for. Students need constant repetition of the names of the doctor’s tools and how they are used correctly, for them to extend and better perfect their role of being a doctor through imaginative play and using these props appropriately. https://www.youtube.com/watch?v=JxdrEFz9Jsw When role playing students who visit the doctor can’t just say “I’m sick” they need to elaborate more on their reasons and symptoms e.g. ‘I feel hot and my body is shivering’, ‘My stomach hurts and I feel like vomiting.’ Students listen to the story, ‘Caillou visits the doctor’. Ask students to listen out for the reasons Caillou is visiting the doctor, as well as the treatments the doctor gives. https://www.youtube.com/watch?v=bZLtsys2M48 (Stop video at 9:40m) After the video discuss the reasons that Caillou went to visit the doctor. Pose the question: ‘Why did Caillou need to go visit the doctor?’ ‘What was he feeling?’. Brainstorm different reasons we may need to go and visit a doctor. Encourage students to extend their thinking beyond just stating, “I’m sick!” Encourage students to use these ideas in the role playing. Reflection: Were you a doctor or patient? If you were a patient, what were your symptoms? If you were a doctor, how did you treat your patient?
0 Comments
 MA1-1WM Describes mathematical situations and methods using every day and some mathematical language, actions, materials, diagrams and symbols. MA1-17SP Gathers and organises data, displays data in lists, tables and picture graphs, and interprets the results. Mathematician Centre Prompt: Make a graph! Introduction - ● Explain to the students that today’s focus will be on the Mathematician Centre. Students will be involved in gathering and representing data. ● Revise understanding - TPS ‘What is Data?’ Revisit the definition of data. Data is a collection of information gathered by observation, questioning or measurement. Data is often organised in graphs or charts for analysis and may include facts, numbers or measurements. ● Discuss with students the importance of collecting data and examples of when we might need to collect data eg. Favourite food, favourite sport, most popular subject etc ● Display a PowerPoint of different types of tally and picture graphs and examples of surveys and questions that can be asked to collect good data. E.g. a tally of how many types pf birds they see in their garden. Explain that when asking questions, it’s important to limit the persons responses to about 4 or 5 so that they have to choose an option rather than giving any response they like. This will give you more information for your graph as it’s limiting the responses. ● Explain that today students are going to collect data by keeping a tally of how many bottle flips they land after 20 tries. Watch video- https://youtu.be/RDIcrjMbIVA ●Explain that before they begin to take the data, they need to decide on how many people are going to join their investigation and write their names on the tally graph. Teacher is to model how to do this on a tally graph and choose 5 students to demonstrate. ●Ask the students to predict the number of bottle flips they may land before they begin and record it. ●Ask the students to stand at the front of the room and flip their bottles on a table at the same time. Model how to record a tally mark each time they land the bottle, bottom down. Repeat this 20 times, students are to tally their own flips. ●Model how to interpret the tally graph once the information is recorded onto the tally graph. TPS- Ask the questions: Who landed the greatest number of bottle flips? Who landed the least number bottle flips? Who landed the same number of bottle flips? ●Model how to use the information on the tally graph to make a picture graph on the empty graph. Model how to name the horizontal axis with the names of the students who flipped the bottles and the vertical axis with the number of flips landed after 20 flips. ●Model how to choose a picture to draw that represents each successful flip. E.g., a smiley face, bottle or bottle cap. Model how to draw them for each person to represent the tally marks on the tally graph. ●Model how to interpret the picture graph once the information is recorded onto the tally graph. TPS- Ask the questions: Who landed the greatest number of bottle flips? Who landed the least number bottle flips? Who landed the same number of bottle flips? ●Explain that students can take data on other things like, coin flips (heads or tails), colours of cars that pass by in 5 minutes, types of animals they see in the playground, types of leaves, collect data on types of rubbish left in the playground. Explain that students need to work in pairs to come up with an investigation question, collect the data, create a tally graph and a picture graph, and then interpret the data they collected. ●Students can use the ipad to take evidence of their data collection and record their graphs using pictures. Reflection: Students can think about how they are going to present their data to the whole class. Introduction/explicit learning (Linked to syllabus)
EN1-2A - Plans, composes and reviews a small range of simple texts for a variety of purposes on familiar topics for known readers and viewers. EN1-7B - Identifies how language use in their own writing differs according to their purpose, audience and subject matter. Read my Review! – Year 1 Week 6 Author’s Centre Prompt: Write a Review! Introduction ● Explain to the students that today’s focus is on the Author’s Centre and their task is to write a book review about a story that they have read. Read the prompt and revise what a book review is and its purpose. A book review’s purpose is to help people decide whether the book would interest them enough to read it. Reviews are a sneak peek at a book, not a retell. ● Teacher writes the following two statements on the board. - Jessica is in Year 2 and she tells really funny jokes. - This chair is blue, and I think its pretty uncomfortable when you sit on it for a long time. ● TPS Ask students to discuss what they notice about the statements made by the teacher. Guide them to understanding that they included both a fact and an opinion. ● Explain to the students that today in the Author’s Centre, they will be writing a book review. As a class, recap the structure of a book review. Prompt the students by asking ‘What should be included in our book review?’ ‘Think of your audience. What would they want to know about the book if they have never read it? Teacher brainstorms students’ responses. ● Show the students the poster of the structure of a book review using ‘SOR’ guide. Title of the story: Reviewed by: S - summary O - opinion R - recommendation ● Explain to the students that you have a deconstructed book review about a familiar story called ‘The Gingerbread Man’ cut up into paragraphs. As a class, read each paragraph and have the students work together to identify and sequence each paragraph of the book review. Once the book review has been constructed, read as a whole class to see if it is a sequential order of summary, opinion and recommendation. ● Read the story: ‘Pig the Pug’ by Aaron Blabey https://www.weekendnotes.com/pig-the-pug-book-review/ ● TPS a summary of what the story is about. Encourage students to orally compose a few sentences to tell the main idea of the story. Point out the importance of not giving away the ending to encourage the audience to want to read the story themselves to find out what happens at the end. Model writing a strong introduction to capture the reader’s attention. In Pig the Pug we are introduced to Pig who is a greedy and selfish little dog who lives in a flat with a sausage dog named Trevor. In the book Trevor asks Pig if he can share his toys with him. Pig reacts angrily to the suggestion and refuses to share. The book contains an important message about sharing and ends on a humorous note. ● Refer back to the two statements written on the board. Students point out which part of each statement is an opinion. - Jessica is in Year 2 and she tells really funny jokes. - This chair is blue, and I think it’s pretty uncomfortable when you sit on it for a long time. Explain to the students that opinions are personal thoughts or ideas. TPS. Students share their opinion of the story and give a reason to justify their answers. ‘What was your favourite part of the story?’, ‘Why you enjoyed reading this story?’, Who was your favourite character and why’ etc Teacher models writing a paragraph to express their opinion of the story. ● Point out that the final paragraph in a book review is the recommendation. Have students think very carefully about who they are most likely going to attract to encourage them to read the story. Teacher models writing a recommendation on the board. ● Read the jointly constructed book review with the whole class. Reflection: Students can think about how they are going to present their book reviews to the whole class. Suggest that these can be written book reviews with an illustrated picture to match, or some students could record their book reviews on an iPad etc. Students share their reviews with the rest of the class. 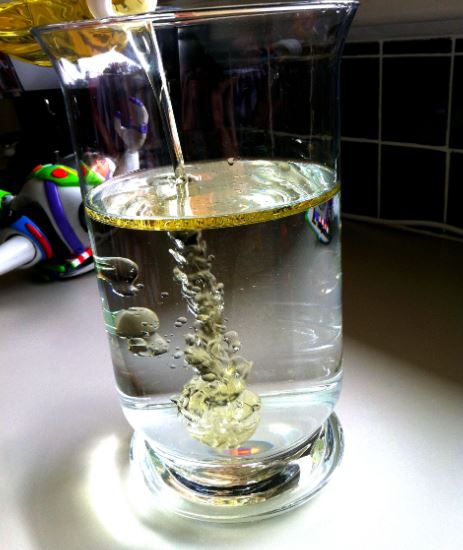 ST1-WS-S: record observations accurately and honestly using observational drawings, labelling, informal measurements and digital technologies (ACSIS026, ACSIS039)
Explorers Centre Prompt: Explorers: Combine and Observe! Introduction - ● Explain to the students that today’s learning centre focus will be on the Explorers Centre. Students will be involved in observing (or looking closely at) what happens when different materials are combined with water. ● TPS ‘What do we do when we observe something? ● Explain that when we observe something we need to look closely at the materials and use our scientist eyes to explore and describe everything that we see (colour shape), feel (thickness, consistency) and smell using our words and recording our observations by drawing and writing. ● Show students the different materials available at the centre for observation. (Washing liquid, oil, tea, coffee, flour, rice). Explain that it is our job to choose 1 material and observe it carefully, then draw what we can see accurately and describe what we see, feel and smell. ● Model how to fold an A4 paper in half and accurately draw the jar with the oil inside on the left side of the crease. ● Model how to use our scientist eyes to observe the material ‘oil’. Asks students to TPS ‘describe what the oil ‘looks like using your observation eyes’ to your partner. Use the student’s responses to model how to draw what you can ‘see’ and label the drawing using adjectives to describe observations. For example bright yellow and thick. ● Choose a couple of students to smell and feel the texture of the oil and describe it using adjectives. Model how to label the drawing using adjectives to describe the smell and texture before the oil is mixed with water. ● Explain that now that we have described what we can see, feel and smell, our next job is to predict or hypothesis what will happen when we combine or mix the oil with water. TPS- what ‘predict’ means. Explain that to ‘predict’ or ‘hypothesis’ means that we are using our observations to guess what we think will happen when we combine oil and water together using our prior knowledge. ● Students TPS- Predict what will happen when we combine the oil and water and give a reason for your thinking. Teacher to record student’s prediction. ● Watch the video- https://www.youtube.com/watch?v=XmjpZCNfcOE Ask students to think about the following questions and TPS; What happened when the water was combined with the oil? Did the 2 materials mix together? How do you know? What happened when food colouring was added? Why do you think? (Oil and water do not mix. Oil is less dense than water and floats on top of the water. Food coloring is water-based so it mixes with the water. When you add the food coloring to the oil it will not mix. Once you add the oil to the water, the food colored droplets start to drop down since they are heavier than the oil. Once they drop into the water they start to dissolve and look like tiny explosions) (or fireworks). ● Model how to accurately draw the combined mixture of the oil and water on the right side of the crease. ● Model how to use our scientist eyes to observe the combined materials ‘oil and water’ and draw and label what is observed. Use student responses to record description above in detail. E.g Oil and water did not mix when combined. The oil floated on top of the water because it is lighter than the water. The water is heavier than oil. ●Encourage students to talk to their partner about their observations and describe what they can see to each other as they are working. Students can use the iPad to take a photo of their drawing and record their descriptions using the voice recorder to present to year 1. ●Explain to students that they can use any of the materials in the centre to combine with water and observe what happens. Remind them to draw, describe and label the materials before combining it with the water and to predict what they think will happen and how it will change once combined. Reflection: Students can talk about their findings to the class and explain their observations using their drawings and technology. MA1-1WM Describes mathematical situations and methods using everyday and some mathematical language, actions, materials, diagrams and symbols.
MA1-17SP Gathers and organises data, displays data in lists, tables and picture graphs, and interprets the results. Mathematician Centre Prompt: Make a graph! Introduction - ● Explain to the students that although they have been introduced to the new prompts in learning centers this term, today’s focus will be on the Mathematician Centre. Students will be involved in gathering and representing data. ● TPS ‘What is Data?’ Revisit the definition of data. Discuss and scribe students’ responses and prior knowledge about data. (Data is; to find the quantities of something, numbers, facts, observations, measurement, graphs and information). Data is a collection of information gathered by observation, questioning or measurement. Data is often organised in graphs or charts for analysis and may include facts, numbers or measurements. ● Discuss with students the importance of collecting data and examples of when we might need to collect data eg. Number of boys and girls in schools, favourite sport, most popular subject etc ● Watch the video below. Ask students to think about the following questions; -What data is the man collecting? -What method did he use to collect his data? ● TPS the responses to the questions above. ● Inform the students that the Learning Intention for today’s intro is to sort and classify the shoes that they are wearing. Pose the question: ‘How can we sort our shoes?’ Take some students’ suggestions. Explain that the class will carry out an investigation to answer this question.’ ● Have students sit in a circle. Teacher shows the students her/his shoe and describes its appearance, feel and function (eg ‘This is my shoe. I wear it because it is comfortable to walk in all day. It is black and white and has laces along the top. My shoe is soft and smooth because it is made out of leather.’) ● Ask students to put one foot out in front of them in the circle, so everybody can see their shoe. Ask a few students to introduce their shoe in a similar way. For each student, ask questions to prompt their description and investigation of their shoe. As students are describing their shoe, point out similarities and differences between their shoe and the other shoes presented to the class. (eg. ‘Your shoe is black just like my shoe and Max’s shoe’ or ‘Your shoe has Velcro straps, but Susan’s shoe and my shoe have laces’.) ● Explain that although every shoe is different, they are similar in some ways, too. These similarities can be used to organize the class’ shoes. ● Prompt students to think carefully and creatively about the categories and sort the shoes a variety of ways. Questioning might include: -Can every shoe be placed in a category? In which category does your shoe fit? -Do any shoes fit into more than one category? ● Guide the students thinking by posing the question: ‘What are the most common types of shoes in our class?’ As a group, brainstorm and list different categories that can be used to sort the shoes such as; -buckles -shoe laces -velcro strips -slip-ons ● Record findings as a class. Have students identify which category their shoe fits into. Discuss ways to record their observations/investigation such as tally marks, picture graphs, column graphs etc. Reflection: ● Point out the importance of analysing the data once it is collated and recorded to find out the answer to the investigating question (‘What are the most common types of shoes in our class?’), as well as making simple inferences. ● Looking at the data, ask the students: -‘Where does your shoe fit in the class data?’ -‘Do all the categories have the same number of shoes? -‘Do some categories have fewer shoes? -‘Why do you think there is a variation between the number of shoes in each category?’ - ‘Why might shoes with buckles be the category having the smallest number of shoes?’ ● Revisit the question posed at the start of the investigation: ‘What are the most common types of shoes in our class?’ Term 2- week 10 Thursday
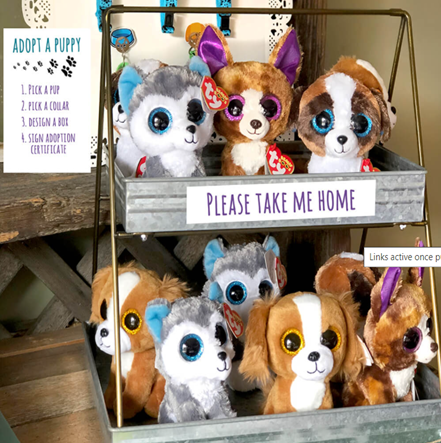
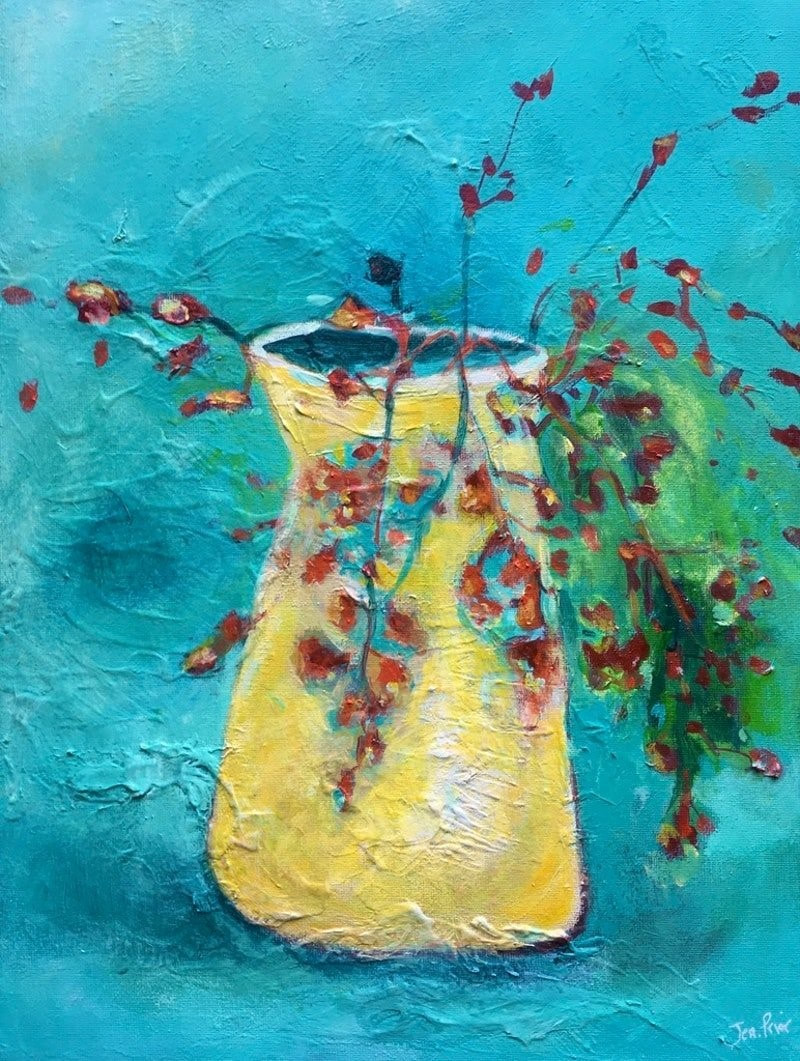
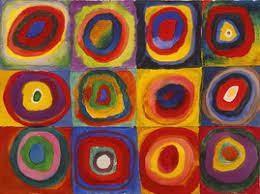
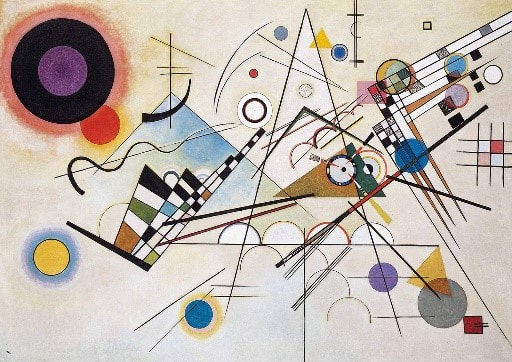
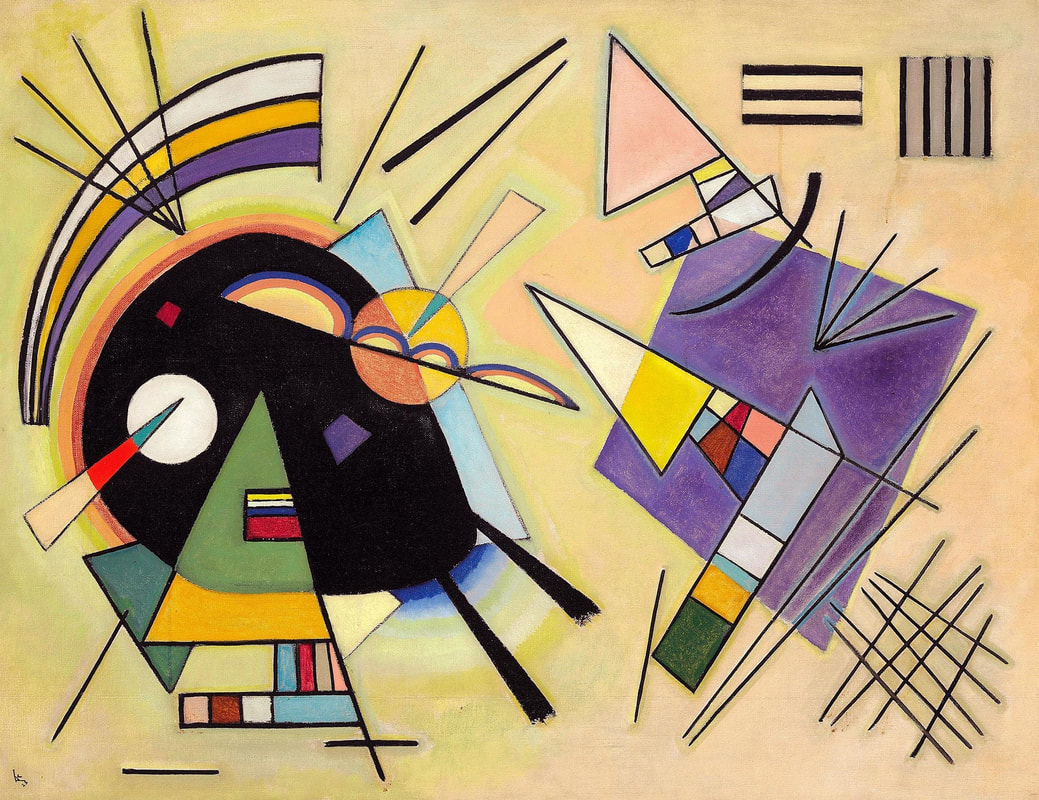
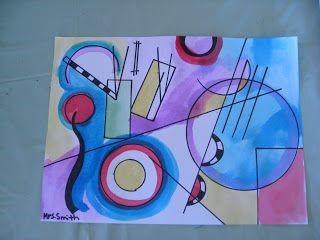
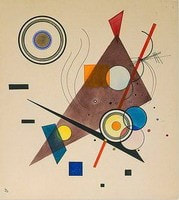
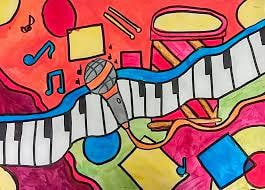
Today we are focusing on writing persuasive texts in our Authors pet rescue shelter! We have a number of different animals looking for a new home. Our authors will create persuasive texts to convince you why each pet is the right pet for you! To get things started, we will learn more about why animals are donated to an animal rescue shelter and how people can adopt them. Ask students to listen carefully for reasons that we should adopt a pet. Watch video- What Is an Animal Shelter - https://www.youtube.com/watch?v=_CIC1OXl2u0 Watch video- What Is an Animal Shelter - https://www.youtube.com/watch?v=_CIC1OXl2u0 Watch video- 10-Year-Old Has Only 10 Minutes to ADOPT A PUPPY - https://www.youtube.com/watch?v=kzpW0Y7A8F4 TPS- Reasons we should adopt a pet from an animal shelter and record it on a chart. -Display and review the structure of a persuasive text- OREO (opinion, reasons, examples and opinion). -Explain that in the authors centre we are going to write a text to convince or persuade our audience to do adopt our pet. Today we are going to look at examples of texts and then write a persuasive text together so that you can start thinking about the ideas and language to use when you are writing to persuade! -We will need to think about good reasons why our audience should adopt our pet. We need to use facts as well as persuasive language to convince the reader that they must adopt our pet. -Ask students to listen to the story and think about the reason the dog uses to convince the homeowners to adopt him. Students should listen to the most convincing reasons as they may use them in their own persuasive writing. Watch read aloud book- CAN I BE YOUR DOG by Troy Cummings- https://www.youtube.com/watch?v=liGPckseaJI Students TPS- Reasons the dog used to convince the homeowners to adopt him and record it on a chart. -Display a text persuading an audience to adopt a pet. - Identify the structure of the text OREO (opinion, reasons, examples and opinion) and the persuasive language, high modality words and time connectives. -Tell student they can use what they learnt about persuasive texts to create a piece of writing that convinces someone to adopt one of the pets. -Jointly construct a text as a class and point out key features of persuasive text that they can use in their own writing: ie intro giving information about the pet (description) and arguments giving reasons why the animal would be a good pet! Reflection- Share and discuss their persuasive text with the rest of year 1. Year 1 Term 2 Week 9 VAS1.1 Makes artworks in a particular way about experiences of real and imaginary things. Artists Centre Prompt: Create your own shape artwork - Introduce the new Artists centre. Display the prompt and explain that students are going to create an artwork using shapes. Link this to 2D shapes that students have been learning about in Mathematics. Revise what 2D shapes are. - Explain that in the Artists Centre students have clicked on a QR code and listened to Mrs C. share some information about an artist named Fernand Leger, prior to creating their own 2D shapes artwork. Tell the students that in today’s session we are going to learn about another artist named Wassily Kandinsky who is also an abstract artist. He too uses geometric and irregular shapes as well as lines and colours to create his artworks. - Show the students the autobiography of Wassily Kandinsky, to learn about who is and what kind of artist he is. https://www.youtube.com/watch?v=_-H42hoR0-s - Show the students a realistic painting (of a vase and a tree) and one of Kandinsky’s abstract artworks. -TPS: ‘Compare the two paintings and TPS what the differences are between the two, and what they think the word ‘abstract’ means? (The vase/tree is a realistic picture whereas an abstract painting does not represent a real image). - Explain to the students that abstract art means that it is not really a picture of something realistic that we can automatically identify. Kandinsky uses geometric and irregular shapes, lines and colours in interesting ways to create patterns and artworks that are completely abstract. He also has a condition called ‘Synaesthesia’ where he could see colour in music. Kandinsky was also known to paint whilst listening to music. - Watch the video of Kandinsky’s Black & Violet artwork, to show how he represented his artworks when listening to music. - Introduce and watch the story ‘The Noisy Paint Box’ by Barb Rosenstock which is based on a true story of how Kandinsky became an abstract artist. https://www.youtube.com/watch?v=NovIGjDDdNc - Abstract art is more about the artist showing how they feel and expressing how they feel on a page, rather than painting something realistic. - Show the students the two artworks’ below. Ask the students the following questions: ‘What 2D shapes do you see?’, ‘What irregular shapes can you see?’, ‘What do you think the lines represent?’ and ‘How do you feel when you look at this artwork?’ - Model how to use Kandinsky’s artworks below as inspiration to create their own abstract artwork using geometric and irregular shapes as well as lines and colour. Have music playing in the background to encourage students to think about what Kandinsky created whilst listening to music. Music to listen to while painting.
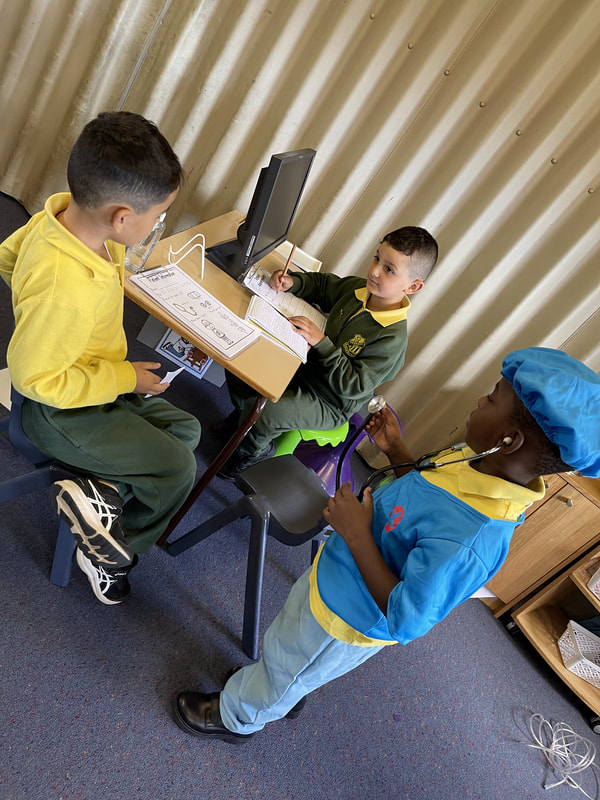
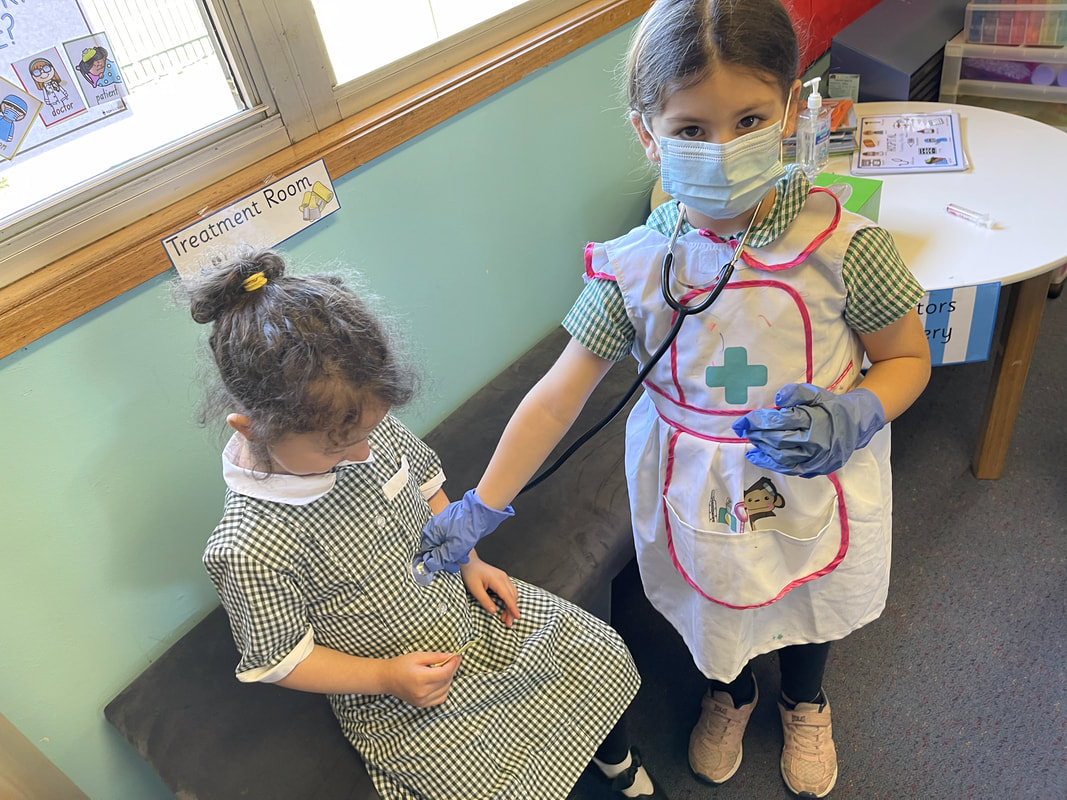
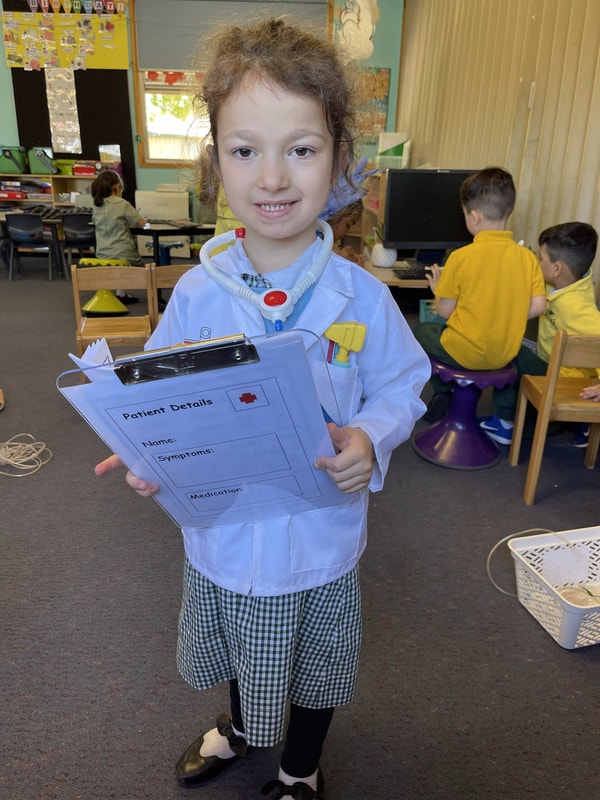
https://www.youtube.com/watch?v=jxT9VcLVOV4 https://www.youtube.com/watch?v=MVzUfiVlfr0 https://www.youtube.com/watch?v=RGSF5AGZ7oI https://www.youtube.com/watch?v=jE1Ms55GFF0 - Reflection: Students present and share their artworks they created. Talk about shapes, lines and colours used And how they felt whilst creating their artwork. 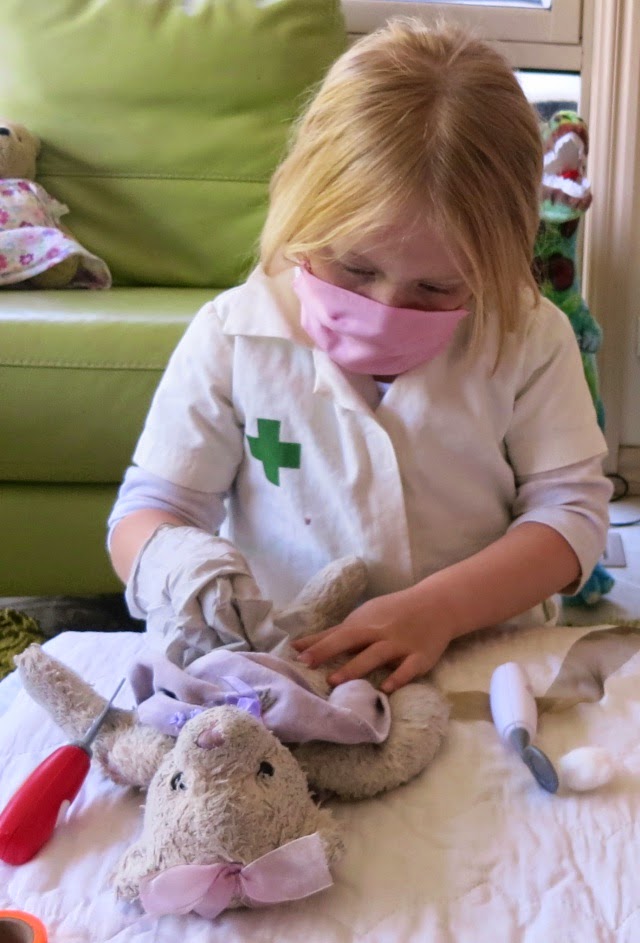 Last week, students were introduced to the Doctor's Centre. Students had the opportunity to experiment for the first time with various types medical equipment and develop their oral language by putting to practice some technical language that was taught during the lesson introduction though role play. Students spent most of the lesson playing the roles of doctor and patient and thinking of new conditions and treatments. Today’s lesson will give students the opportunity to extend their thinking and language development further by recording the patient’s conditions and treatment on a symptoms pad and then recording the medical treatment needed on a prescription pad. Introduction: Discuss some role-play scenarios that students worked on in last week’s centres. Watch students role play from cbeebies Watch: https://www.youtube.com/watch?v=T_IvYAl8iIA Elmo Visits the Doctor Sesame Street: https://www.youtube.com/watch?v=PNqPxBYJ4QE Elmo- Mr Noodle tries to use a stethoscope https://www.youtube.com/watch?v=FDvTj5gj90M Discussion- Think, pair, share: Various possible conditions for each body part that patients can possibly suffer from. Record on a mind map. Teachers to model discussing who is going to be the doctor and patient (or use a stuffed animal patient). Teachers to role-play doctor and patient scenario. (Ensure to refer to equipment by the correct name, model the conversation between a doctor and patient etc.) Explicitly model how to stop after the patient has told you what they are suffering from and draw a picture of the afflicted area on the symptoms pad. E.g. broken leg. Then model how to continue assessing and treating the patient using technical language. To end the consultation teacher models how to record the treatment using drawing and words on the prescription pad. Model how to write a prescription of medicine or exercises for the patient to purchase at the pharmacy and take at home. Teachers to swap roles and model again. Discuss prompts with students: Can you pretend to be a doctor or a patient?
Explain to students that they are to: Have a turn to be the patient, have a turn to be the doctor, use the special ‘doctor’ words, record conditions on the symptom pads using picture and words, record treatments on the prescription pad using pictures and words. Explain that the rest of the students are going to work in the Construction centre, Bird centre or Story centre. Reflection: Students share their role plays with the class. Term 2- Monday Week 8 7/06/22
Introduction – Mathematicians Chance MA1-1WM Describes mathematical situations and methods using everyday and some mathematical language, actions, materials, diagrams and symbols MA1-3WM Supports conclusions by explaining or demonstrating how answers were obtained MA1-18SP Recognises and describes the element of chance in everyday events Prompt: Create a book of impossible things. -Introduce the new mathematicians centre. Explain that over the next 2 of weeks year 1 have the challenge of making a book of impossible things. Explain that we will be learning some mathematical words that we use in chance that help us when we are discussing the chance of how likely or unlikely something is to happen. TPS- What does impossible mean? Discuss and explain that impossible means that there is no way that something can happen. It will NEVER happen. e.g., dogs will fly. TPS- What does possible mean? Discuss and explain that possible means that something ‘might’ or ‘may’ or ‘maybe’ happen but it’s not ‘certain’ or 100% sure to happen. There is a ‘chance’ it ‘could happen’. TPS- What does ‘certainly’ happen mean? Discuss and explain that ‘certainly’ means that something ‘will definitely’ happen for sure. E.g. the sun will come out tomorrow morning. TPS- What does ‘uncertain’ mean? Discuss and explain that ‘uncertain’ means that ‘unsure’ or ‘not sure’ that something may happen. E.g. I’m uncertain if I’ll have a good day at school tomorrow. Watch on IWB - Mr impossible – Mr Men https://www.youtube.com/watch?v=NbscKewdToI Watch on IWB - An Ordinary Day by Rod Clement https://www.youtube.com/watch?v=webNDlDsGFk -Pause the video after each page. Students are to TPS, the impossible things on the page. Record their responses on a chart. Model- how to fold two A4 pages in half to create a book. Label the book “book of impossible things”. -Explain to students that their challenge is to think of the most creative and imaginative things that could never ever happen. These things are ‘impossible’ to happen. They will then draw a picture of the impossible thing and write a matching sentence in their book. Ask Aaron to read and share the ‘impossible book’ that he made last week during learning centres. Ask students to give feedback on each page. Students TPS- ‘impossible things’ that could never happen and share responses with year 1. Record on a chart. Model- how to draw a picture and a matching sentence in the impossible book using a student’s suggestion. Play a game on IWB- to practise possible and impossible scenarios. https://www.ixl.com/math/grade-2/more-less-and-equally-likely Reflection- Present and discuss impossible book to the rest of year 1. Term 2 Week 7- Thursday 3.6.21
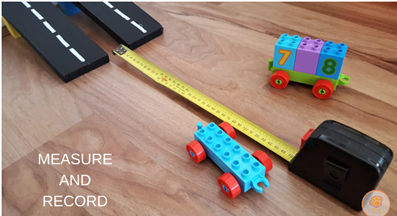
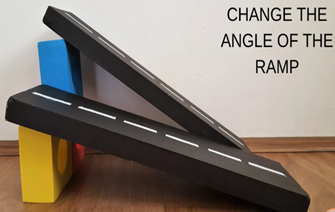
Introduction – Inventors (Measuring length) Prompt: Invent a ramp to make your car travel further. -Introduce the new inventors centre. Explain that over the next 2 of weeks year 1 have the challenge of inventing a car that travels the furthest possible and a car ramp that they can use to help their car travel a long distance. -To be successful students must invent their very own car using Lego, mobile and Duplo. They must think of a way to invent their car to travel the furthest possible until it comes to a stop. TPS- the difference between long and tall? Discuss responses and watch the video below to check if they were correct. https://www.teachstarter.com/au/blog/teaching-measurement-the-best-informal-measurement-activities/ -Discuss how the language of length. Long is from side to side- one side to the other side. Tall is up and down- from the floor to the sky. -TPS- Do you think the size, or the weight of the car will help your car go / travel further? Explain your thinking to your partner. Record responses on the board. Explain to students that it is their challenge to prove if weight or size helps their car travel further by experimenting with different sizes, materials and weights when making their car. Display- Different Lego and Duplo students can use to make their cars/ vehicles. Model- how to make a car and add wheels to it and make it secure. TPS- How can you measure the length or distance your car has travelled using materials we have in our class. Record responses. E.g. paper clips, pop sticks, unifix cubes, tens, blocks etc. Watch- Introduction to Nonstandard Measurement for Kids: Using Paper Clips to Measure https://www.youtube.com/watch?v=q8o7n-A0SC0 Watch - Experiment with Car Ramp- https://www.youtube.com/watch?v=cs2qPatwDNE Model – how to choose a material to use when measuring the length travelled by your car.
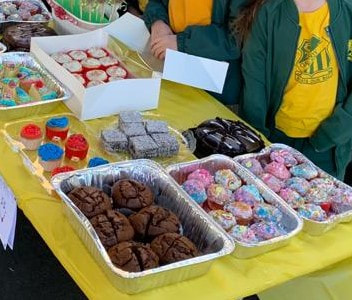
Reflection- Present and discuss findings and challenges they had in inventing the car and ramp with year 1. This week we are changing/ extending the learning prompts we are using for the different centres. As we are focusing on persuasive text, our new Authors centre is a pet rescue shelter! We have a number of different animals looking for a new home. Our authors will create persuasive texts to convince you why each pet is the right pet for you! To get things started, this intro will look at persuasive text with a focus on author and purpose. We will jointly construct a text to convince Kindergarten students to come to our cake stall on Wednesday (this is our culminating task for our mini unit of work on money!) Proceeds will be donated to an animal rescue shelter. Intro: Explain to students that we can write for lots of different purposes, ie to retell, describe, inform etc - this is what we are working on as authors in the authors centre! "For the next few weeks we are going to use time in the authors centre to write a text to convince or persuade our audience to do something. Today we are going to write a persuasive text together so that you can start thinking about the ideas and language to use when you are writing to persuade! On Wednesday, Year 1 is going to hold a cake stall for Kindergarten. We are going to write a text that we can read to kindergarten to convince them to bring in some money to support our cake stall. We will start by giving them information about the cake stall. Then we will think about the reasons they should come and write them together." Have photos for each reason to prompt discussion (ie delicious cakes at cake stall, cute animal in rescue shelter to help, dollars and coins for learning about money).
After writing explain that in the authors centre students will actually have their own animal rescue centre just like the one they are donating to. Tell student they can use what they learnt about persuasive texts to create a pice of writing that convinces someone to adopt one of the pets. Read jointly constructed text and point out key features of persuasive text that they can use in their own writing: ie intro giving information about the pet (description) and arguments giving reasons why the animal would be a good pet! 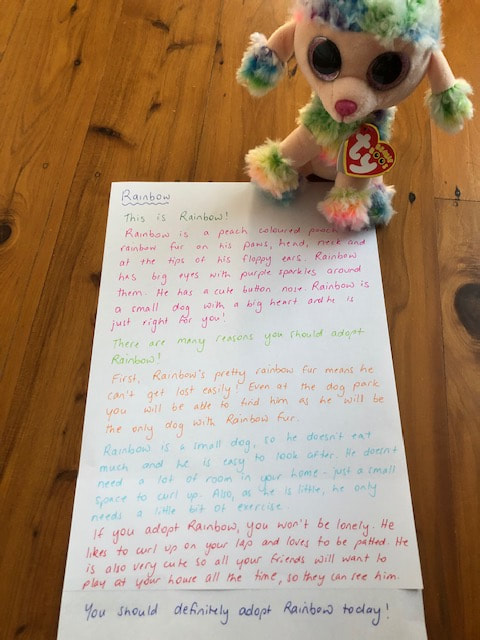 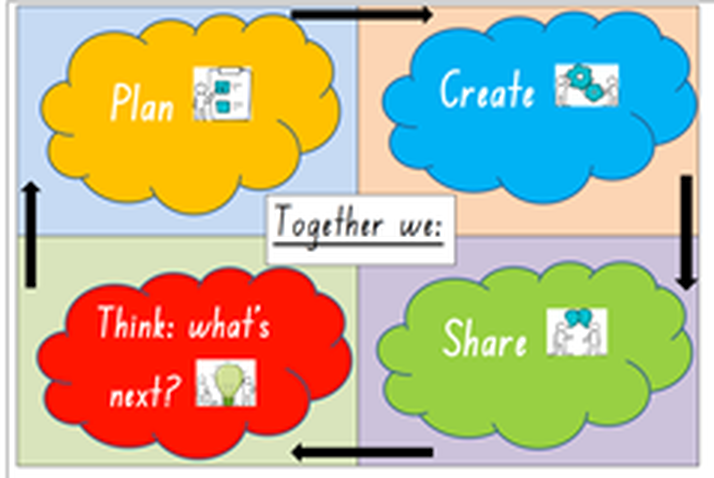 Introduction
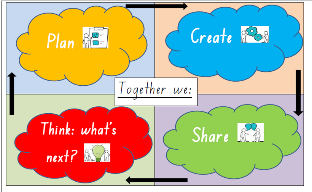
-Explain to students that today is the last day of our 6-week learning centre cycle. This means that we have worked hard at our centres each week to Plan, create, edit, challenge ourselves to pursue what is next in our learning. Today we are going to share or present our learning to year 1 in an interesting way that would engage our year 1 audience. -Explain that students will choose a sample of their best work that they have created over the 5 weeks. They will reflect on ‘how they planned, created and perfected it’ with a partner. Model how this can be done with students. -Review the below LI and SC and how their work reflected the plan. -Brainstorm engaging ways to present their work and findings to the year 1 audience. E.g. a book, poster, recording, digital story, photos etc. -Students are to spend this final session completing their work and reflecting on how they will present it to our year 1 audience in an engaging way. They need to remember to include all the parts of the flowchart. Learning Intention: WALT be creative and self-regulated learners and share our learning with others. Success Criteria: · Plan carefully · Create: Practise and build on strategies I am learning – how can I challenge myself? · Share my learning in different ways · Think about where to next in my learning This is because: Students require opportunities to self-direct their own learning and learn how they can deepen their learning by challenging themselves. Students engage in learning that is meaningful to them and learn that they can inspire others and be inspired by sharing quality learning. Presenting and Reflecting- Students present their completed work to the year 1 audience. Their peers have the opportunity to ask questions and also give feedback to improve their future learning. (“where to next goals). Year 1 Term 2 Week 6 Mathematician Centre Prompt: Create a mini supermarket and go shopping. Introduction ● Explain to the students that you have noticed that some students were having difficulty with adding and subtracting money when making purchases at the supermarket last week. Therefore, todays lesson focus is to represent money values in multiple ways and calculate change from $20. ● Discuss the importance of being able to add and subtract money when going shopping. Make sure that students understand that an amount of money can be represented in a variety of ways. ● Watch the video and have student’s workout how to add the total amount of notes. https://www.youtube.com/watch?v=nvi1_DK7hJw start video at 4:36 for Australian Dollars ● Display the $1, $2, $5, $10, $20, $50 and $100 dollar notes on the board. Have students revise/identify the different notes displayed and discuss their value. ● Point out that it is both the responsibility of the customer and the cashier to add up the items bought. As well as working out the correct amount of change that needs to be given out.
● Choose 4 students to stand out the front of the class and give them each a plastic slip (wallet) with different amounts in it, ranging from $1 to $50. Point out to the students that when we are counting all our money we are using ‘addition’. The customer will also need to count the change given to make sure that they were given the right amount. They will be using the operation of ‘subtraction’. ● Choose four different students to stand at the front. Explain to the students that they are going to be given $20 each to spend at the supermarket. Inform them that they can choose any items they would like from the supermarket, but the total amount must not exceed $20. Provide ten frames and unifix blocks to assist students with adding and subtracting their total amounts spent and how much change is required. ● Provide whiteboards or paper for students to record the items that were purchased and how much they cost.As well as how they worked out how much change needed to be given from$20. ● TPS – Why do you think it was easier to add and subtraction money using the ten frames or unifix cubes? Students explain their thinking. ● Encourage students to use the tens frames or unifix blocks to assist them with adding and subtracting how much they spent at the shops. Reflection- Students share their findings with year 1. Term 2- Week 5 (Monday)
Prompt: Investigate the natural environment
Introduction -Today we are going to introduce a new centre called the ‘explorers centre’. We are going to look more closely at the explorer’s centre “Investigate the natural environment”. Explain to students’ when exploring the natural environment in our school garden, we are using are scientist eyes to explore the different types of leaves (have some leaves to demonstrate) bark, sticks, flowers, grass, and insects. Using our scientist eyes, we are accurately drawing what we see in detail. -We are going to watch a video about a student named Austin who improved his work by revisiting it and making changes just like these students in Year One have done. (Some of you have seen this video before, but that’s ok, because each time we watch and listen we have the opportunity to see something new that we may not have noticed before.) Show students Austin’s Butterfly video: https://www.youtube.com/watch?v=hqh1MRWZjms -Talk to students about persevering in our work, listening to feedback and making changes to show our learning. Display some examples of student’s work from last week’s learning centre.
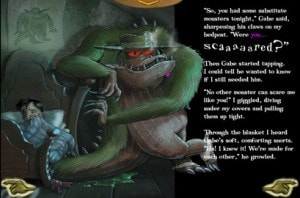
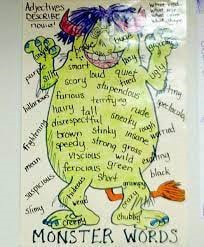
Display – a detailed scientific picture of a curl worm’s lifecycle found on the ipad and read the scientific labels. Suggest that student’s can look closely at the curl worm and guess what stage of the lifecycle the worm may be up to and what observation helped them make that decision. Model- how to draw a detailed picture of the curl worm (draw exactly what you see) and find the words to describe what they see to label the details in the picture. Model how to choose adjectives to describe the worm using speechie cards to help. TPS- the colour, size, texture and how it moves and record student’s responses. -Model how to use the labels to write a description of the curl worm to share with others. Students can record descriptions using a voice recorder, video, labelled drawing and writing. Review- the prompt question and the criteria at that centre to be successful. Reflection- Students share their detailed drawings and descriptions with year 1. Year 1 Term 2 Week 4 Inventors Centre Prompt: Create a monster using the blocks and your imagination. ● Revisit the prompt in the Inventors Centre. Explain to the students that the prompt is asking you to create a monster using the blocks and your imagination. The next step is to draw a replica of the monster you created from blocks and write a matching description. Discuss the meaning of replica. Discuss why the monster drawn needs to be the same as the monster created using blocks. ●Explain to the students that they are going to participate in an activity to show them the importance of listening to a text and making sure the illustration matches the text exactly. Choose 4 or 5 students to come sit on the chairs at the front of the class. Give them each a green and blue marker and a whiteboard. Teacher reads the following paragraph aloud and have students draw what they hear. Choose 4 or 5 students to come sit on the chairs at the front of the class. Give them each a green and blue marker and a whiteboard. Teacher reads the following paragraph aloud and have students draw what they hear. My name is Melvin. I am a green monster. My body is oval-shaped like a potato and covered with warts. I look out from under your bed with my one blue eye, right in the middle of my head. You’ll hear me breathing with my big mouth, but I hope you don’t laugh because I only have five teeth: 3 on top and 2 on the bottom. It’s because I can’t brush my teeth! My stubby arms won’t reach, and I can hardly pick up a toothbrush with my fat fingers. I run around on four feet, and sometimes I trip on my long-lizard like tail! 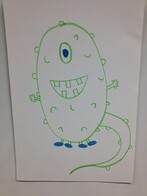 ● Have the students reveal their drawn Monster of Melvin to the rest of the class. Discuss the similarities and differences in their drawings and have them tell you what you could add to your paragraph to be more specific to help their monsters look identical to the one described in the paragraph. Point out the importance of how detailed the description needs to be. ● Show the students the 3D animated short story: I Need My Monster by Amanda Noll and Howard McWilliam. Ask students to observe the different monsters in the story and identify the different adjectives that described each monster. https://www.youtube.com/watch?app=desktop&v=RpXyGkDoYDQTPS Why do you think Ethan wasn’t scared of the other monsters? Why did he prefer Gabe the monster? Identify what Gabe looked like, what kind of monster he was and the different adjectives that were used in the story to describe him. ● Show the students the Character traits poster and discuss what to include in a character description. Have students look at the illustration of Gabe the monster. TPS some adjectives to describe the monster. Share responses with the class. Teacher scribes’ responses on chart under the appropriate 5 senses pictures.
● Explain that a good description has detailed physical traits as well as personality traits of the character being described. ● Refer back to the Inventors Prompt and remind students of the importance of what makes a good description. Brainstorm different ways the students can record their descriptions. eg take a photo, draw a picture or record the monster they have created; to share with others. 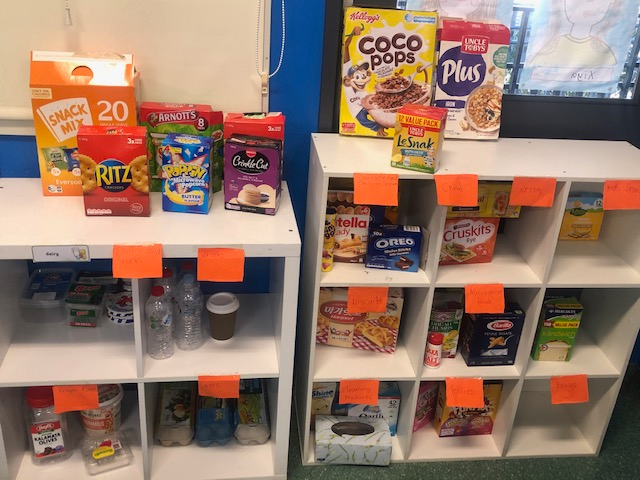 Learning centers Term 2 Week 3 (Thursday)
Prompt: Create a mini supermarket and go shopping.
-Explain that this term one of the new centers that we are going to set up is in the mathematicians Centre. Year 1 are going to work together this term to set up a supermarket in to demonstrate how we can be Mathematicians in the real world. Explain that we need to be good mathematicians when we go to the shop and buy things. -Ask students to TPS in pairs – all the ways we can be mathematicians when we go to the shops to buy something. -Record and discuss responses. E.g., we need to read prices on items, identify the correct amount of money we need to buy an item, we need to add and subtract money, we need to have a shopping list and add up how much money we need to pay, we need to calculate how much change we need to get back, we need to decide on how many items we can afford to buy with the money we have in our wallet and we need to identify the correct amount of money (coins or notes). -Discuss the importance of being able to identify money when we are shopping. We need to count or add up money so we can calculate how much to pay the cashier. Explain that WALT identify Australian money, both coins and notes in order to add and subtract amounts that we need to buy our items. WALT identify coins and dollars from lowest to highest value. Watch the Skwirk video on Youtube that identifies the Austrailan coins and notes- https://www.youtube.com/watch?v=rMy7WDt2Hr4 Identify different denominations presented in the video. Talk about the different symbols used (c, $) and what they mean. ( Cents are a smaller unit of measurement than dollars. Each dollar is made up of 100 cents). Discuss with students and display play money to sort. -Explain that we have been collecting different shopping items for our supermarket in the last week. But our items were all mixed up on our shelf and were not organised into categories or like items together. Explain that yesterday the mathematicians in our supermarket center started to organise the food into groups that go together and put them up onto the shelves. Explain the mathematicians should be able to organise groups of items that are the same. Display a photo from Monday’s lesson. Give students 1 minute to notice what items were grouped or organised together. TPS / discuss and record the groups of food students noticed. Discuss the labels/ signs that the mathematicians have made on the shelves to help them organise the food into categories and make it easier to find when they are shopping for items. Explain that if everything has a space and is clearly labeled it will make it easier for the customers to find their items. -Today, the students in the mathematician’s center will need to decide how much they should price each item in the supermarket. Their job is to be very careful not to over price items. Display- some supermarket catalogues to students. Model how to find similar items in the catalogue and to check how much they are being sold for. Students can then decide to price that item similarly but to the nearest whole dollar so that items are easier to add and subtract. E.g. if eggs cost $5.35, students can price them as an even $5. -Model how to use small round stickers to label the item and stick it on the item so that customers can decide on if it’s in their budget to buy. -Explain that students must work together to decide on prices for all items before they label them. https://www.youtube.com/watch?v=s2eDawFb9ro -Students can then practice shopping and adding 2-3 item prices together to work out how much it will cost them to buy. Reflection- Students are to share their experience with the rest of stage 1. Year 1 Term 2 Week 3 Authors Centre Prompt: Make a ‘What is it? book of clues. This term Year 1 students are focusing on literal descriptions and using descriptive language orally, and in their writing to make it more interesting. The primary purpose of descriptive writing is to describe a person, place or object in such a way that a picture is formed in the reader's mind. Capturing an event through descriptive writing involves paying close attention to the details by using all your five senses. Introduction: Explain to the students that each centre has new prompts but today we will look more closely at the Author’s Centre. Read the prompt to the students and tell the students that we will be focusing on the use of adjectives in today’s lesson. Show the students the video about adjectives https://www.youtube.com/watch?v=wDma5RUjw9U https://www.youtube.com/watch?v=4f3H12YNlxo TPS Ask students ‘What an adjective is and its purpose. Come up with a definition as a class. Explain that adjectives are describing words that give more information about a noun and that their five senses can help them construct adjectives. Ask students to identify the five senses. Display the ‘speechie’ cards on the board and discuss each one. Point out the five senses. Tell the students that each of these cards can be used to help us identify adjectives. As a class, brainstorm adjectives appropriate for each card. Teacher writes given adjectives under pictures. (Write a few adjectives under each picture as examples. These lists of adjectives can be added to at a later stage). Show the students the brown paper bags (mystery bags). Tell them each bag has a mystery object inside and they need to guess what’s inside each one based on the clues that I give them. Explain that the clues that will be given are adjectives to help the students guess the object. Start with bag #1. Put the clues (adjectives) on the board above the bag for students to guess. Have students use the clues to predict the object. Point out the fact that all these adjectives help the person guessing paint/create an image in their heads. These words told you how it looked, smelt, felt, tasted, what colour it was, what it was made from, etc Repeat the process with the remaining mystery bags. Inform students that today in the Authors Centre they need to choose objects from around the classroom that will fit into their brown paper bags. They need to keep this a SECRET! Encourage students to choose objects that can be easily described using adjectives. Students make a ‘What is it?’ book of clues where they will write adjectives (clues) that describe the hidden objects in their bags. Encourage students to write at least 4-5 adjectives for each object. Reflection: Students can share and read their ‘What is it?’ book of clues and have students predict/guess what the objects are in the bag. Discuss whether it was easy/hard to predict the objects being described? How did the adjectives help us to determine what was in the bag? Why are adjectives important in describing nouns? 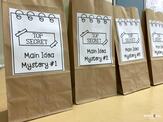 Year 1 – Term 1 Week 9 In previous sessions in Learning Centres, students have been actively engaged in creating their personal stories about themselves through the process of planning, designing, and creating a book. Students enjoyed making their published versions of their book about themselves using items and photos that were collected from home and put into their ‘Me in a Bag’. The question of ‘What can you do next with your learning?’ was posed to a few students. This question baffled them as in their minds their work was completed. Today the focus will be on encouraging students to challenge their learning further and incorporating the use of technology by making a digital story about themselves. Digital storytelling is a powerful way to connect young learners to reading, writing, and digital literacy. It also showcases students learning for peers, teachers, and audiences beyond the classrooms, all of whom can interact with the storyteller. Introduction: Explain to the students that learning is a continuous cycle and our learning can be presented in many ways. Explain that although they might sometimes think they are finished with a project in Learning Centres, there is always something they can do next to continue and further challenge their learning. There is always a ‘where to next’ in all centres! Look at the flow chart and explain to students how they have worked through each component of the flow chart when creating their books about themselves. Reread the prompt question, ‘Can you make a book about yourself?’ Point out the challenge task; ‘Make an e-book on the iPad’. Explain that an e-book is a digital story.
TPS Ask students to explain what they think a digital story is and its purpose. Digital storytelling uses multimedia tools to bring narratives alive. Digital stories are typically videos that combine audio (sound), images, and videoclips to tell a story. The purpose of a digital story is to share it with an audience. Students watch the video of an introduction to storytelling. https://www.youtube.com/watch?app=desktop&v=e5usc00wa40 TPS Students talk about different ways that they can create a digital story. eg using apps such as Book Creator, taking photos and adding text, video recordings of themselves orally telling their story, etc Inform students that you are going to show them one way a digital book can be created, through using the app Book Creator. Discuss and revisit student’s prior knowledge and experiences of using ‘Book Creator’ in Learning Centres in Kindergarten. Teacher Models how the published book ‘All about me’ from previous sessions can be used to plan and create a digital story. Show the students how the Book Creator app allows you to insert:
Allow the students with opportunities to present their digital stories in their own way. They do not necessarily need to use book creator. Some students may wish to have a peer record them telling their story. Share – Provide opportunities for students to share their digital stories with their peers during Reflection time. Encourage students to think of ways that they could share their digital stories with other audiences eg other classes or with their families by uploading it on Dojo. Today I noticed a student very engaged and focused on building his bridge. I initiated a conversation with him about his learning. He had built a very detailed pedestrian bridge and was busy putting in some supports to help stabilise the bridge. I noticed that the bridge he built didn’t match the picture he had drawn on his plan. (His plan was of a bridge over water to be used by vehicles). We talked about the idea that lots of bridges do go over water but I wondered what the bridge he built was for. The student explained to me that it was a ‘people bridge’ so the people could get from one side to a shop on the other side. The student had included stairs on either side for the people to walk up and down. We talked about where he might have seen a bridge like this before in our community. I asked him if he had ever been to Granville train station and he excitedly said he had caught a train there and he had gone under a 'people bridge' on a train. We went onto the computer and searched for images of Granville train station. The student typed Granville train station on the keyboard (prompted to copy ‘Granville’ from his school shirt and stretched out train and segmented station). The student chose a photo of the pedestrian bridge at Granville station and we printed it out. We then looked closely at the picture and at the LEGO build. With prompting the ‘engineer’ noticed he included stairs but didn’t have a guardrail/fence along his bridge. We discussed the need for this as a safety feature and he added it to the bridge. He also added a train and tracks under the bridge so others would know more information about the bridges purpose. The student found a picture of a train in the LEGO book and used it to gather some ideas for his build. Photos were taken to document the ‘engineers’ learning and he had the opportunity to share his learning with the class. During reflection he was able to explain the purpose of his bridge and the important features he included. He could demonstrate how he used the details on from the photograph of Granville station and the train in the LEGO book to make his bridge more accurate.  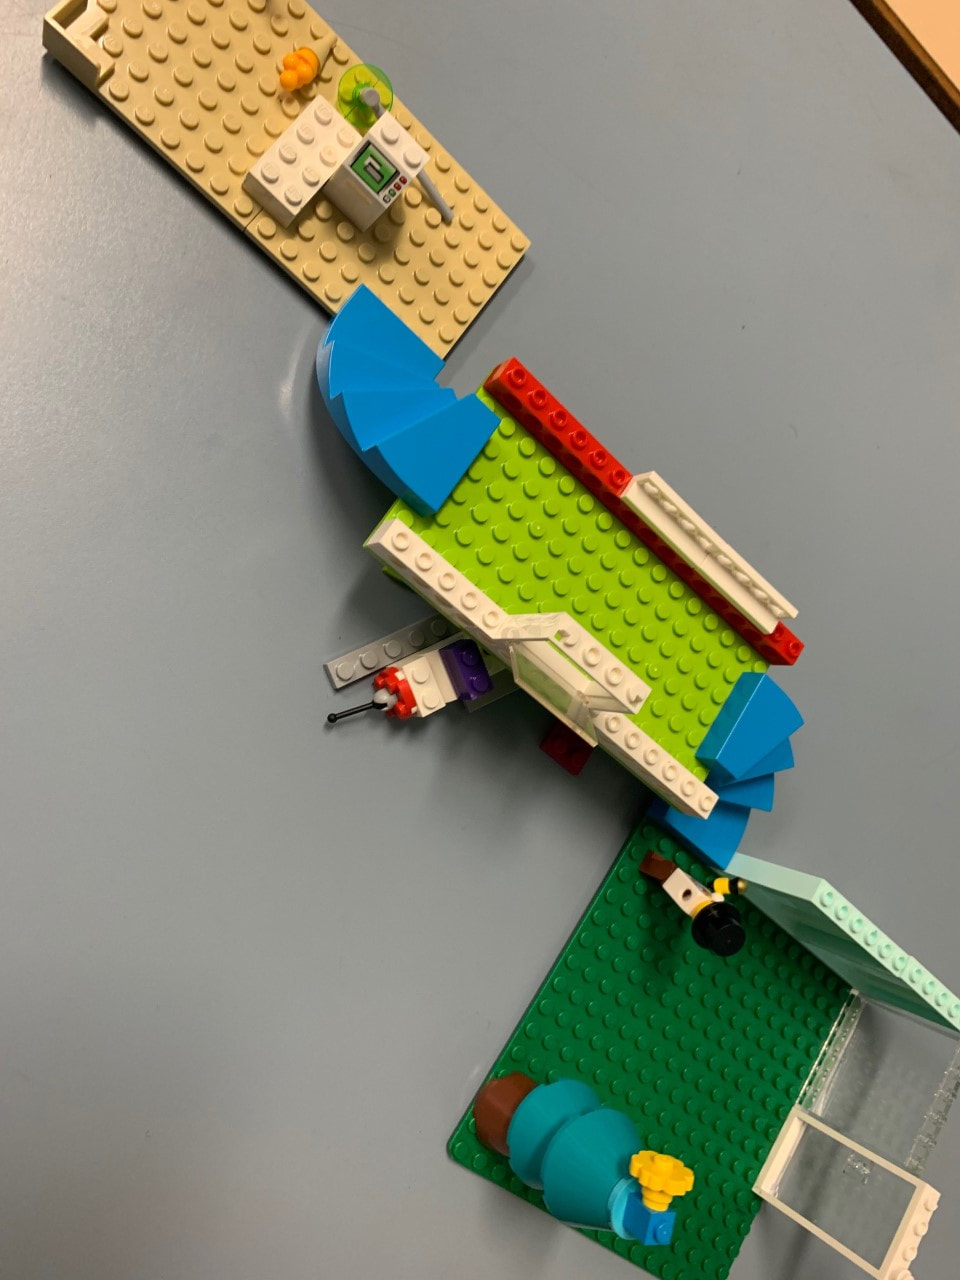 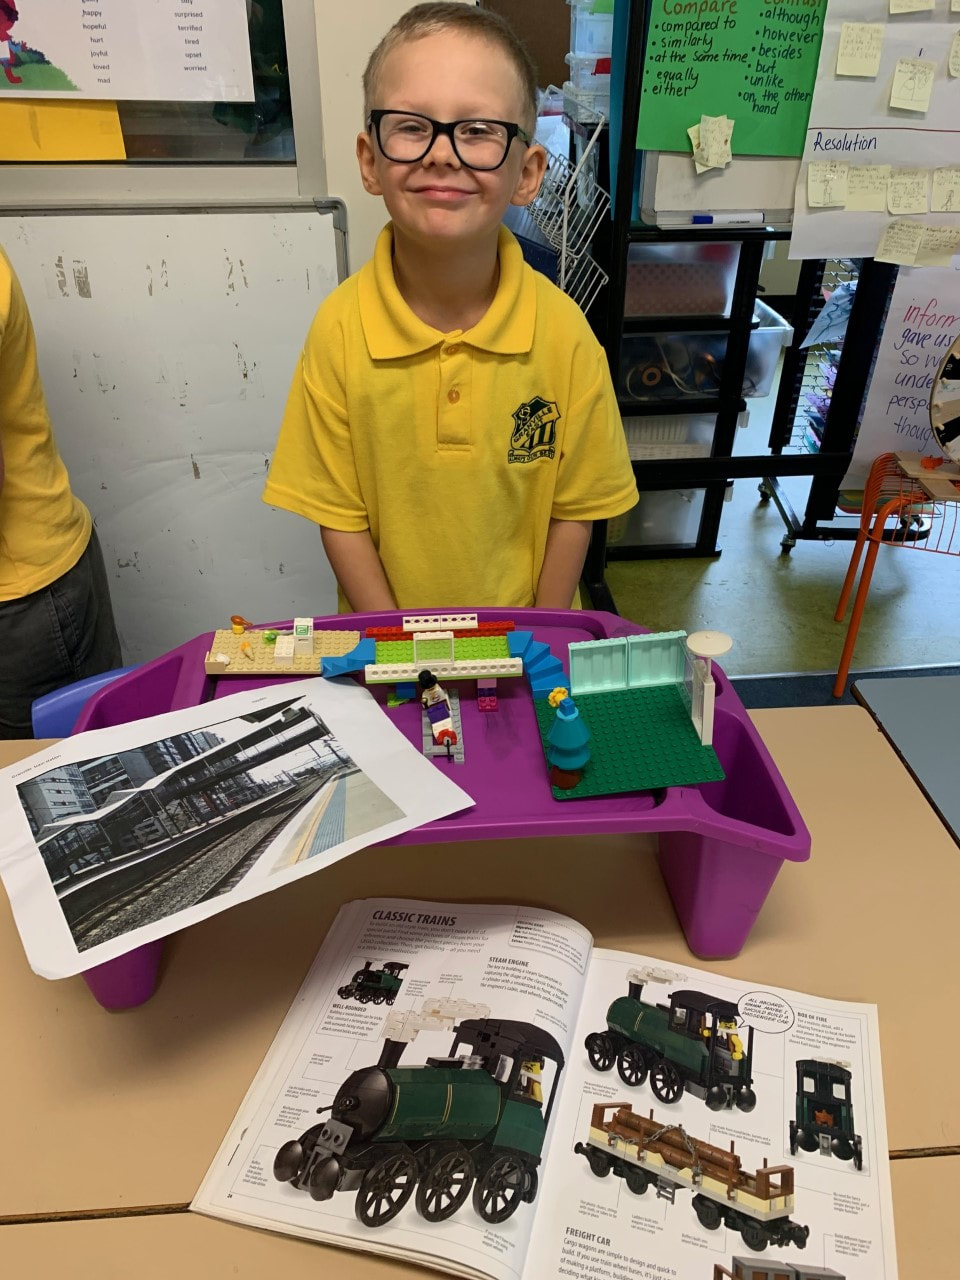 Another student who was sitting close by was listening in to some of our conversation. She picked up on the idea that we could use bridges we have seen in our community to help create a bridge. She independently made changes to her bridge and created a giraffe out of LEGO to provide context for her bridge! She had remembered her excursion to Sydney Zoo and made the pedestrian bridge that allows visitors to view the animals at Sydney Zoo. She was able to explain the purpose of the bridge she created. I then assisted her to look up and print a picture of the bridge from Sydney Zoo to support her thinking. The student matched the photograph against her build to make changes to her design.
Where to next? During the next session student 1 will be provided with a photograph of the bridge he designed and built from LEGO. The ‘engineer’ will use a word bank to label important parts of his design (stairs, bridge, guard rails, platform, shop, railway track etc.) A teacher will then work with the student to jointly construct and write a sentence about the purpose of the bridge and why it is important.
Year 1 - Term 1 week 8 Inventors Prompt: Can you make a telephone to communicate with a friend? How does it work? Year 1 had the opportunity over the last couple of sessions to plan, collaborate and create string telephones in the inventor’s centre and challenge themselves by writing an explanation about how to use their device. This week’s focus is to allow students the opportunity to be creative and challenge their learning further by designing their own communication device as part of the ‘what’s next’ part of our learning. Introduction: Explain that today we are going to focus on what’s next in our learning once we have finished creating our sting telephones and writing an explanation of how to use it. Explain that we will be inventors and design our very own communication device for others to use. Refer back to the learning intention and revise the process of planning, creating, where to next and sharing. Display – a timeline of communication devices that were invented over the years in history starting from Alexander Bell’s first design. Discuss similarities and differences in design and function as technology advanced. Telephones now help us communicate in a much more advanced ways then the simple telephones of the past. Students TPS differences and similarities of different devices and teacher records thoughts. Display prompt- Can you make a device to communicate with a friend? How does it work? Plan- Explain that students will be designing their own communication devices and thinking about what features it will have and how it works. Students may take inspiration from a device that was invented in the past or a more modern day device. They may also have their own brand new invention that has not yet been created. Their first job is to think about what it will look like and draw / design it on paper. The next step is to add details of how it functions and special features that make it work efficiently e.g. dials, buttons, numbers, touch screen, Antenor etc. This design process is the most important part of the invention. Model how to add labels and ideas of how the device may work. Play video- It’s not a box by Antoinette Portis- https://www.youtube.com/watch?v=jwqxd4SfNcw -Discuss how they can change a box into a communication device by planning, designing and creating their own ideas into an invention. Display- a picture chart of design ideas on how to create a device using different materials, cardboard and paper of various devices in history. Plan Design- Draw the plan for your design so that you know what it looks like, the size, shape and how it functions. Play short how to clip- https://www.pinterest.com.au/pin/774971048375324422/ Teacher displays an example of a phone she has made at home and models how to plan the design. Create- Explain how each design looks and functions differently. They must think of the best materials needed to make their device and how to draw, cut, stick and add detail to their design to make it look and function realistically. They must then work with a partner to create their design and test it. They must work together to problem solve and fix problems that may arise in the design and create process. Teacher models how to choose resources for her own phone design and the steps in the creation process. Record- Students may then work together to write an explanation about how their device works to share with year 1 at reflection time. Share with year 1 during reflection. |
AuthorBlog about our K-2 learning centres, written by teachers and for teachers! |


 RSS Feed
